Everything You Wanted to Know About Resume Margins

When the text doesn’t fit, your resume margins should be first on your list of things to adjust.
By: David Hartley | Contributor for Let’s Eat, Grandma
So you’ve finally gotten motivated to shoot for that new job and update your resume.
You’ve gathered all the great metrics from your career and chosen the achievements you wanted to highlight. But, just as you’re finishing putting it all onto one or two pages…
It doesn’t fit.
Tired of not landing interviews?
Get our free 3-step guide to writing better resume bullet points, featuring 70 ideas for metrics you can use!
Much like many of us have found with our pre-pandemic pants, you may find, to your frustration, sometimes your experience doesn’t fit into your resume. If your resume spills over onto the top of a second or third page, you’ll want to adjust something to tighten it up.
There are many ways to shorten your resume to a skimmable length that recruiters will love. But before you start deleting any potentially valuable information, you might want to check on your resume margins first.
What Are Resume Margins and Why Are They So Important?
First: if you’re not familiar with the term, margins are the white space on the top, bottom, left, and right of a document. Microsoft Word and Google Docs will often set them to 1 inch by default, but you can actually customize them on your own when designing your document.
Setting the correct resume margins makes your document both easier to read and more space-efficient.
If your margins are too small, your document won’t have enough white space and will look cramped and hard to read. But if your margins are too large, you’re wasting valuable space that could be used for your more important accomplishments.
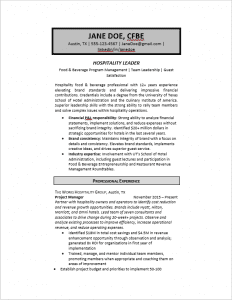
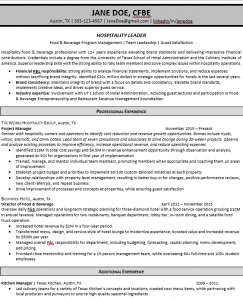
At Let’s Eat, Grandma, we generally set our margins at 0.5″. Here’s what a resume with margins set at 0.5” looks like (you may recognize it from our recent hospitality resume how-to blog):

Your resume margins can seem like a small thing to worry about in comparison to strong bullet points or an effective Summary of Qualifications section when you’re designing your resume.
While having a clean design and optimizing white space may not seem as important as metrics and keywords, if you have a cramped, messy, or otherwise aesthetically challenged document, all your work on your content is for nothing if the recruiter has a hard time reading it. So having an attractive document worth looking at deserves attention as well.
This is the time when you put your creative thinking to the test! But beware: Having too many structure changes can ultimately be distracting. Uniformity is key.
So, Resume Margins – What Are the Basics?
Wide resume margins are waste of valuable page space.
There are really only two best practices to follow when modifying the margins on your resume:
- Don’t go smaller than 0.5” on any side
- Don’t go bigger than 1” on any side
Resume margins that are too narrow make the page look crowded.
Other than that, you’re free to get as creative as you would like within that margin (pun intended).
If you find you’re just barely hanging over onto a second or third page, reducing your resume margins to somewhere below 1” but above 0.5” might be the only thing you need to do to make it fit.
If adjusting your resume still doesn’t work, you can also check your font size. However, it’s more likely that you just need to shorten your resume to only include relevant information.
One other aspect to consider is the word processor you are using. While you’ll have the choice of many different options ranging from Pages to OpenOffice, we highly recommend using Microsoft Word. Google Docs is the next best choice if Word is unavailable to you – just make sure the formatting sticks when you convert it to Word or PDF.
Both these processors have incredible flexibility when it comes to designing your resume and setting your resume margins, and you want to submit your resume as a Word or PDF document anyway; most Applicant Tracking Systems and recruiters will have a hard time accepting, opening, or reading alternative file formats like .pages or .otf.
But How do I Set my Margins?
I’m glad you asked, dear reader! It’s much simpler than it sounds. Let’s walk through instructions for at each word processor:
Microsoft Word
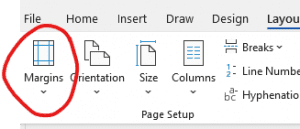
In Word, you can set resume margins in the Page Setup section of the ribbon.
To set your resume margins manually, you can click on the rulers alongside the program box and drag your cursor where you want your margins to land. But for a more precise adjustment, click on the Layout tab in your top toolbar, and then click “Margins” on the left. Within this drop-down box, there are some presets you can choose from within the 0.5” to 1” range. Pro-tip: Choose the “Narrow” preset for 0.5″ margins all around, the default for the professional resume writers here at Let’s Eat, Grandma.
If you would like a bit more control over the exact margins, you can create your own custom margins, including which pages you want the margins to be set for. Something to note, though: Your custom settings will be saved until you modify them again!
Google Docs
Much like Microsoft Word, you can always use the rulers as a quick margin adjustment. However, if you’d like the comprehensive option, click the “File” drop-down and then “Page Layout.” Here you can set your margins, page size, and layout.
You don’t have the flexibility to select pages, but you can highlight content within the document to apply custom margins.
***A couple important notes***
While both Word and Google Docs will work to design your resume, we at Let’s Eat, Grandma highly recommend using Microsoft Word. Its unmatched flexibility allows you to create your perfect resume. The Word .docx file format is still the golden standard when it comes to submitting applications on the company’s online portal or sites such as LinkedIn, Indeed, and Zip Recruiter. Google does allow you to save a document as a .docx, but we’ve seen format issues happen with that approach.
In addition, when choosing 0.5″ margins in Microsoft Word, you may get a message saying your margins are “outside the printable area.” Some things to consider here: 1) most modern printers won’t automatically cut your resume short, and 2) most resumes are read via computer screen rather than printed out nowadays. Just make sure your document is computer-screen legible, and you’ll be good to go!
Final Thoughts
Margins may seem like an inconsequential part of your resume, but much like font, color, and style, your resume margins can be modified to enhance the readability of your document. You likely have great experiences that you want to highlight and adjusting those margins will ensure that all your fantastic achievements make it on the page!
Ready for more job search help?
Sign up for a free Senior Writer Resume Critique to see what's holding you back from landing interviews. One of our top professional resume writers will give you personalized feedback on the top 3 items you can improve based on our expert practices!